Documentation
Runtime for Raspberry
Insert suitable SD card with minimum capacity of 4GB to your computer.
Go to the this link https://www.balena.io/etcher/ where is suitable SD card burning tool „balenaEtcher“. Please download and install it.
Free versions to download:
Image for Raspberry 3B+ Image for Raspberry 4B
After successful installation of burning tool run the program balenaEtcher and click on the button Flash from file. Choose from the explorer downloaded image file for your Raspberry model (3B+ or 4B). 
Please don't extract this file and click to Select target. Choose your inserted SD card on which you want to burn this image and click on the Select button.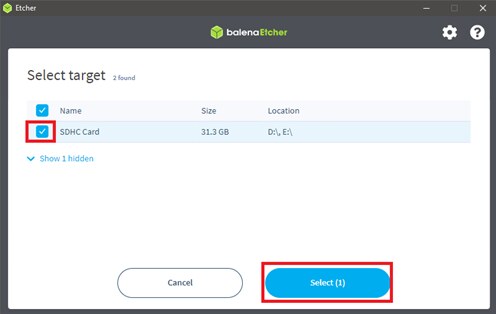
In the last step please click on Flash button and wait for finish of burning process on to your SD card. 
After successfull burning of image on to your SD card please safely remove (unattach) this card from your computer and put it in to your Raspberry device (please be sure that device is powered off). After insert this SD card power up the device.
Insert suitable ethernet cable into the Raspberry Pi and connect it with your PC on LAN network. Set your computer IP in the range 192.168.1.xx (except 192.168.1.10) and run program Idekit Studio.
Try to detect of your PLC via. UDP broadcast.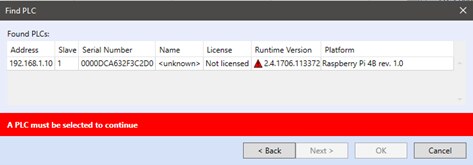
If founded device has red triangle alarm there is update of runtime needed. Continue with attaching PLC into the solution, than with right mouse click choose PLC Operation -> Upload RT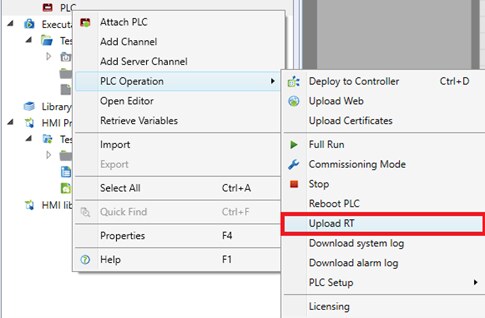